Okay, here’s a blog intro about making cream puffs:Ever since I was a kid, the sight of a perfectly golden, airy cream puff filled with luscious cream has been pure magic.
There’s just something about that light-as-air pastry shell and the cool, creamy filling that screams “treat yourself!” I’ve always been a bit intimidated by making them, thinking it’s some super complicated patisserie technique.
But after doing some digging and experimenting in my own kitchen, I’ve discovered that making cream puffs at home is actually pretty straightforward, and the results are incredibly rewarding.
It’s a skill worth mastering, trust me! Let’s explore the ins and outs of cream puff creation below.
Okay, I understand. Here’s the blog post content.
Decoding the Choux: Understanding the Dough

Making cream puffs all starts with the choux pastry, also known as pâte à choux. This isn’t your typical dough; it’s a cooked dough, which is what gives cream puffs their unique hollow structure.
The magic lies in the high moisture content, which turns to steam in the oven and puffs up the pastry. Trust me, once you understand the process, you’ll realize it’s not as intimidating as it sounds.
I remember the first time I tried to make choux, I was so nervous! I kept thinking, “What if it doesn’t puff up?” But following the recipe carefully and understanding the science behind it really helped me succeed.
Mastering the Cooked Dough Technique
The first step is to combine water (or milk, or a combination of both), butter, salt, and sugar in a saucepan. Bring this mixture to a rolling boil. This is crucial!
You need to ensure the butter is completely melted and the mixture is evenly heated. This step is what sets the foundation for a properly hydrated dough.
Once boiling, remove from the heat and add all the flour at once. I always use a wooden spoon for this part. Stir vigorously until the dough comes together into a smooth ball that pulls away from the sides of the pan.
This usually takes a minute or two.
Achieving the Perfect Consistency
Now comes the muscle work! Transfer the dough to a mixing bowl and let it cool slightly for a few minutes. This is important because you don’t want to cook the eggs when you add them.
Once slightly cooled, begin adding the eggs one at a time, mixing well after each addition. The dough will seem like it’s separating at first, but keep mixing, and it will come back together.
The final consistency should be smooth, glossy, and pipeable. A good test is to lift the spoon; the dough should slowly fall off in a “V” shape. If it’s too stiff, add a little more beaten egg, a teaspoon at a time, until you reach the right consistency.
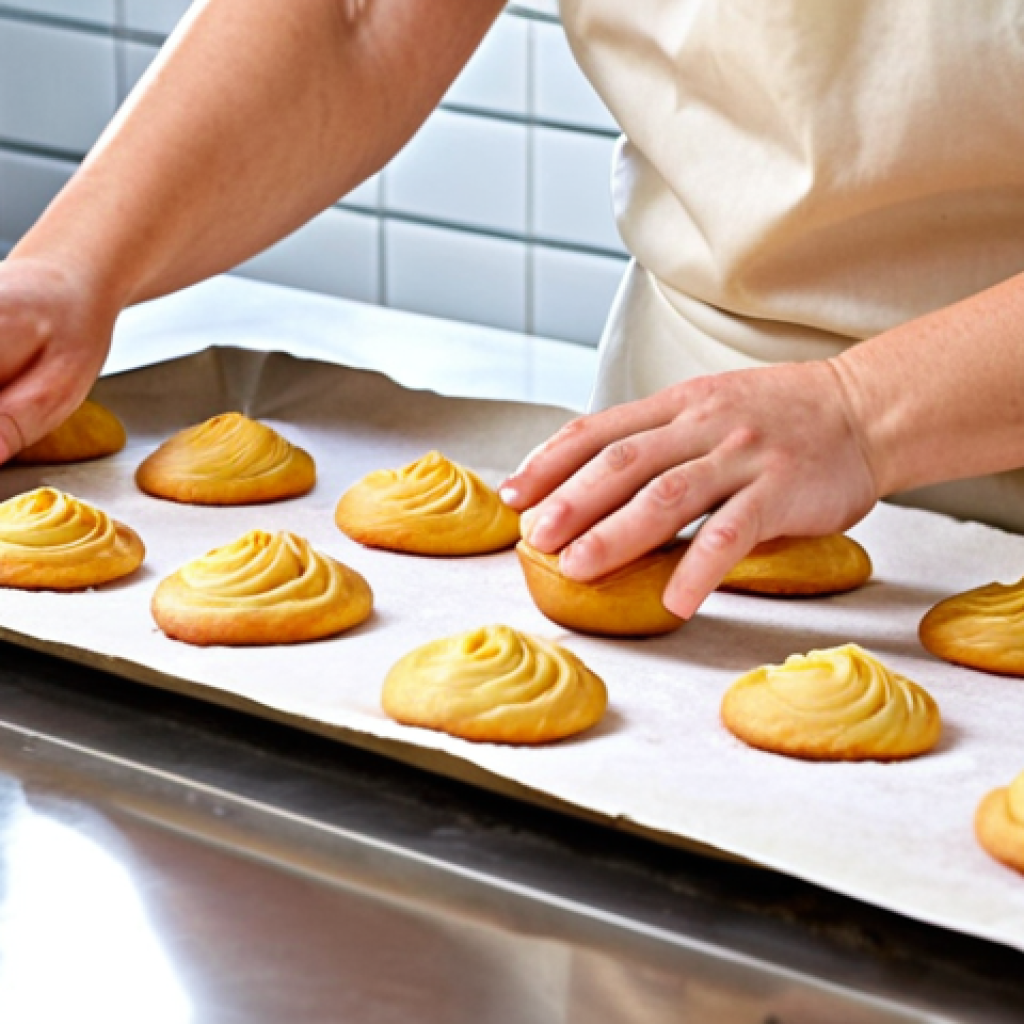
Piping Perfection: Shaping Your Cream Puffs
Once your choux pastry is ready, it’s time to shape those cream puffs! This step is where your creativity can shine. You can make classic round puffs, éclairs, or even swan-shaped pastries.
The key is to use a piping bag fitted with a large round tip. If you don’t have a piping bag, you can use a large ziplock bag and snip off a corner.
Techniques for Uniform Puffs
To ensure your puffs are uniform in size, you can use a template. Simply draw circles (about 1.5-2 inches in diameter) on a piece of parchment paper and place it under your baking sheet as a guide.
Pipe the dough onto the parchment paper, following the circles. Remember to leave some space between each puff, as they will expand in the oven.
The Importance of Even Spacing
Proper spacing on the baking sheet is crucial for even baking. If the puffs are too close together, they may stick to each other and not bake properly.
Aim for at least an inch of space between each puff. I learned this the hard way when my first batch turned into one giant, misshapen cream puff monster!
The Oven is Key: Baking for Optimal Puffiness
Baking is where the magic really happens. The high heat of the oven creates steam within the dough, causing it to puff up and form a hollow center. It’s important to maintain a consistent temperature throughout the baking process.
Opening the oven door too early can cause the puffs to deflate, so resist the temptation to peek!
Temperature and Timing Secrets
Preheat your oven to 400°F (200°C). Place the baking sheet with the piped puffs in the oven and immediately reduce the temperature to 375°F (190°C). Bake for about 30-40 minutes, or until the puffs are golden brown and firm to the touch.
The baking time will depend on the size of your puffs, so keep an eye on them. If they start to brown too quickly, you can lower the temperature slightly.
The Cooling Process: Preventing Deflation
Once the puffs are baked, turn off the oven and prop the door open slightly with a wooden spoon. Allow the puffs to cool in the oven for about 10-15 minutes.
This helps them to dry out and prevents them from deflating. After that, transfer them to a wire rack to cool completely.
The Creamy Center: Filling Options and Techniques
Now for the best part: the filling! You can fill cream puffs with just about anything you like, from classic pastry cream to whipped cream, ice cream, or even savory fillings.
The possibilities are endless! I personally love a light and airy vanilla pastry cream, but sometimes I’ll get adventurous and try different flavors like chocolate, coffee, or even fruit-infused creams.
Pastry Cream Perfection: A Classic Choice
To make a classic pastry cream, you’ll need milk, sugar, egg yolks, cornstarch, vanilla extract, and butter. The key is to whisk the egg yolks and sugar together until pale and thick, then gradually whisk in the cornstarch.
Heat the milk in a saucepan until simmering, then temper the egg yolk mixture by slowly pouring some of the hot milk into it, whisking constantly. Pour the tempered mixture back into the saucepan and cook over medium heat, whisking constantly, until the cream thickens and comes to a boil.
Remove from the heat and stir in the vanilla extract and butter. Pour the pastry cream into a bowl, cover with plastic wrap (pressing it directly onto the surface to prevent a skin from forming), and refrigerate until chilled.
Whipped Cream Wonders: Light and Airy
For a lighter filling, whipped cream is a great option. You can use heavy cream, powdered sugar, and vanilla extract. Chill the bowl and whisk attachment in the freezer for about 15 minutes before whipping the cream.
This helps the cream to whip up faster and hold its shape better. Whip the cream until soft peaks form, then gradually add the powdered sugar and vanilla extract.
Continue whipping until stiff peaks form. Be careful not to overwhip, or the cream will turn grainy.
Assembly Line: Putting It All Together
Once your cream puffs and filling are ready, it’s time to assemble them! There are a few different ways to do this. You can slice the cream puffs in half horizontally and fill them with the cream, or you can use a piping bag fitted with a small tip to pipe the cream into the puffs through a small hole in the bottom.
I personally prefer the piping method because it’s less messy and keeps the puffs intact.
Slicing and Filling: The Traditional Method
If you choose to slice the cream puffs, use a serrated knife to carefully cut them in half horizontally. Fill the bottom half with the cream and then replace the top half.
Dust with powdered sugar for a pretty presentation.
Piping and Plumping: A Cleaner Approach
For the piping method, use a skewer or toothpick to poke a small hole in the bottom of each puff. Fit a piping bag with a small round tip and fill it with the cream.
Insert the tip into the hole and pipe the cream into the puff until it feels plump and heavy. Here is a table summarizing key elements for making the perfect cream puffs:
| Element | Description | Tips for Success |
|---|---|---|
| Choux Dough | The foundation of the cream puff, made with cooked dough. | Ensure proper hydration by boiling the butter and water completely. Add flour all at once and stir vigorously. |
| Egg Addition | Eggs provide moisture and structure to the dough. | Add eggs one at a time, mixing well after each addition. Dough consistency should be smooth and pipeable. |
| Piping | Shaping the dough into uniform puffs on a baking sheet. | Use a piping bag with a round tip. Space puffs evenly to allow for expansion. |
| Baking | The process of puffing up the dough in a hot oven. | Bake at 400°F (200°C) initially, then reduce to 375°F (190°C). Cool in the oven with the door ajar to prevent deflation. |
| Filling | Adding a creamy or flavorful filling to the baked puffs. | Choose your favorite filling, such as pastry cream or whipped cream. Fill generously for the best flavor. |
Garnish and Glamour: Adding the Finishing Touches
Once your cream puffs are assembled, it’s time to add the finishing touches! A simple dusting of powdered sugar is a classic choice, but you can also get creative with glazes, drizzles, and toppings.
I love to drizzle mine with melted chocolate or caramel, or even sprinkle them with chopped nuts or candied fruit.
Simple Sweetness: Powdered Sugar Perfection
A dusting of powdered sugar is the easiest and most classic way to garnish cream puffs. Simply place the puffs on a plate and use a fine-mesh sieve to sprinkle them with powdered sugar.
The sugar will adhere to the puffs and create a beautiful, snowy effect.
Glazes and Drizzles: Adding Extra Flavor
For a more decadent touch, try drizzling your cream puffs with melted chocolate, caramel, or a simple glaze made from powdered sugar and milk. To make a glaze, whisk together powdered sugar and milk until smooth.
Add a drop of vanilla extract or other flavoring, if desired. Drizzle the glaze over the puffs using a spoon or a piping bag.
Storage Secrets: Keeping Your Puffs Fresh
Cream puffs are best enjoyed fresh, but they can be stored for a day or two if necessary. The key is to store the puffs and filling separately to prevent the puffs from becoming soggy.
Storing Unfilled Puffs: Maintaining Crispness
Store unfilled cream puffs in an airtight container at room temperature for up to 2 days. To refresh them, you can bake them in a preheated oven at 300°F (150°C) for a few minutes to crisp them up.
Storing Filled Puffs: A Race Against Time
Filled cream puffs are best eaten within a few hours of filling, as the cream can make the puffs soggy over time. If you need to store filled puffs, keep them in an airtight container in the refrigerator for up to 24 hours.
Be aware that the puffs will lose some of their crispness. I hope this comprehensive guide helps you create the most amazing cream puffs!
In Closing
So there you have it! From mastering the choux dough to adding your creative garnishes, making cream puffs is a delightful journey. Don’t be discouraged by initial hiccups – every baker has their own cream puff story. Embrace the process, experiment with fillings, and most importantly, enjoy the delicious results of your labor! Happy baking!
Handy Tips to Know
1. Invest in a Good Piping Bag and Tip: A quality piping bag and tip will make shaping your cream puffs much easier and more precise.
2. Don’t Overmix the Dough: Overmixing the choux dough can result in tough, dense cream puffs. Mix until just combined.
3. Use Fresh Eggs: Fresh eggs will give your cream puffs a better rise and flavor.
4. Practice Makes Perfect: Don’t be afraid to experiment and try different techniques. The more you bake cream puffs, the better you’ll become!
5. Get Creative with Fillings: While pastry cream is a classic choice, don’t limit yourself! Try different flavors and textures to create your own signature cream puff.
Key Takeaways
Mastering cream puffs involves a few key elements: a perfectly hydrated choux dough, precise piping techniques, a hot oven, and a delicious filling. Remember to be patient, follow the steps carefully, and most importantly, have fun. And don’t forget, the best cream puffs are the ones you make with love (and maybe a little bit of powdered sugar!).
Frequently Asked Questions (FAQ) 📖
Q: My cream puffs always seem to deflate after baking. What am I doing wrong?
A: Oh man, deflated cream puffs are the worst! Usually, it’s one of two things. First, make sure you’ve baked them long enough.
They need to be a deep golden brown and feel hollow when you tap them. If you pull them out too early, they’ll collapse. Second, avoid opening the oven door during baking!
The sudden temperature change can cause them to deflate. I learned that the hard way myself after impatiently checking on them every five minutes. Try extending the baking time a bit, and resist the urge to peek!
Q: Can I prepare the cream puff dough (choux pastry) ahead of time?
A: Absolutely! You can definitely make the choux pastry in advance. I often do this when I’m planning a dinner party or just want to spread out the work.
After you’ve made the dough, transfer it to a piping bag, seal it tightly, and refrigerate it for up to 24 hours. Just let it sit at room temperature for about 15 minutes before piping onto your baking sheet.
I’ve even heard of people freezing the piped dough on a baking sheet and then transferring them to a freezer bag for longer storage. I haven’t personally tried freezing the piped dough yet though.
Q: What’s the best way to fill cream puffs so they don’t get soggy?
A: Soggy cream puffs are a bummer, but here’s my trick: don’t fill them until just before serving! The moisture from the cream will eventually soften the shell.
If you want to get ahead, you can prepare the filling in advance and keep it refrigerated. When you’re ready to serve, use a piping bag with a small tip to poke a hole in the bottom of each puff and fill it.
Alternatively, you can slice the puffs in half horizontally and spoon the filling in. For extra crispiness, you can even dust the inside of the puff with a little powdered sugar before adding the cream.
It helps create a barrier against the moisture. I found this out after making a whole batch for a party and watching them turn to mush after a couple of hours.
Live and learn, right?
📚 References
Wikipedia Encyclopedia
구글 검색 결과
구글 검색 결과
구글 검색 결과
구글 검색 결과
구글 검색 결과